
How to Survive in the Woods Without Gear: The Ultimate No-Tools Survival Guide
Believe it or not, the answer is yes — but only if you know what to do. Whether you’re a seasoned outdoorsman, a weekend camper, or a casual hiker who’s wandered too far off trail, this guide will teach you how to survive in the woods without gear using hard-earned, time-tested bushcraft techniques. No backpack, no lighter, no problem. You’ll learn how to build shelter, make fire, find food, and stay alive when the odds are against you — straight out of the 100 Forgotten Survival Skills That Could Save Your Life playbook for modern preppers.
This post contains affiliate links. I may earn a small commission at no extra cost to you. Learn more.
1. Stay Calm and Assess Your Situation
When disaster strikes, panic is your worst enemy. Your brain burns through oxygen and energy when fear takes over, clouding the very judgment you need to survive. Your first move isn’t physical — it’s mental. Stop. Breathe deeply. Slow your heartbeat and force clarity into your thinking.
Take a full minute to scan your surroundings with purpose. Where are you? What do you hear — wind, water, animals, or silence? What do you smell — smoke, decay, rain? Sensory input gives clues about nearby resources and threats.
Next, assess yourself. Are you bleeding? Cold? Dehydrated? Hungry? Small issues spiral fast when ignored in the field. Tighten or loosen clothing to regulate temperature. Clean and cover any open wounds immediately.
Then look outward. Estimate the time of day using the sun’s position or your shadow. If nightfall is near, shelter becomes priority one — warmth and protection outweigh everything else. Check your surroundings for hazards like unstable ground, cliffs, flash-flood zones, or signs of predators.
Finally, set small, achievable goals: find shelter, locate water, build fire, and stay oriented. Every action should conserve more energy than it costs. Survival isn’t about doing everything at once — it’s about doing the right thing next.
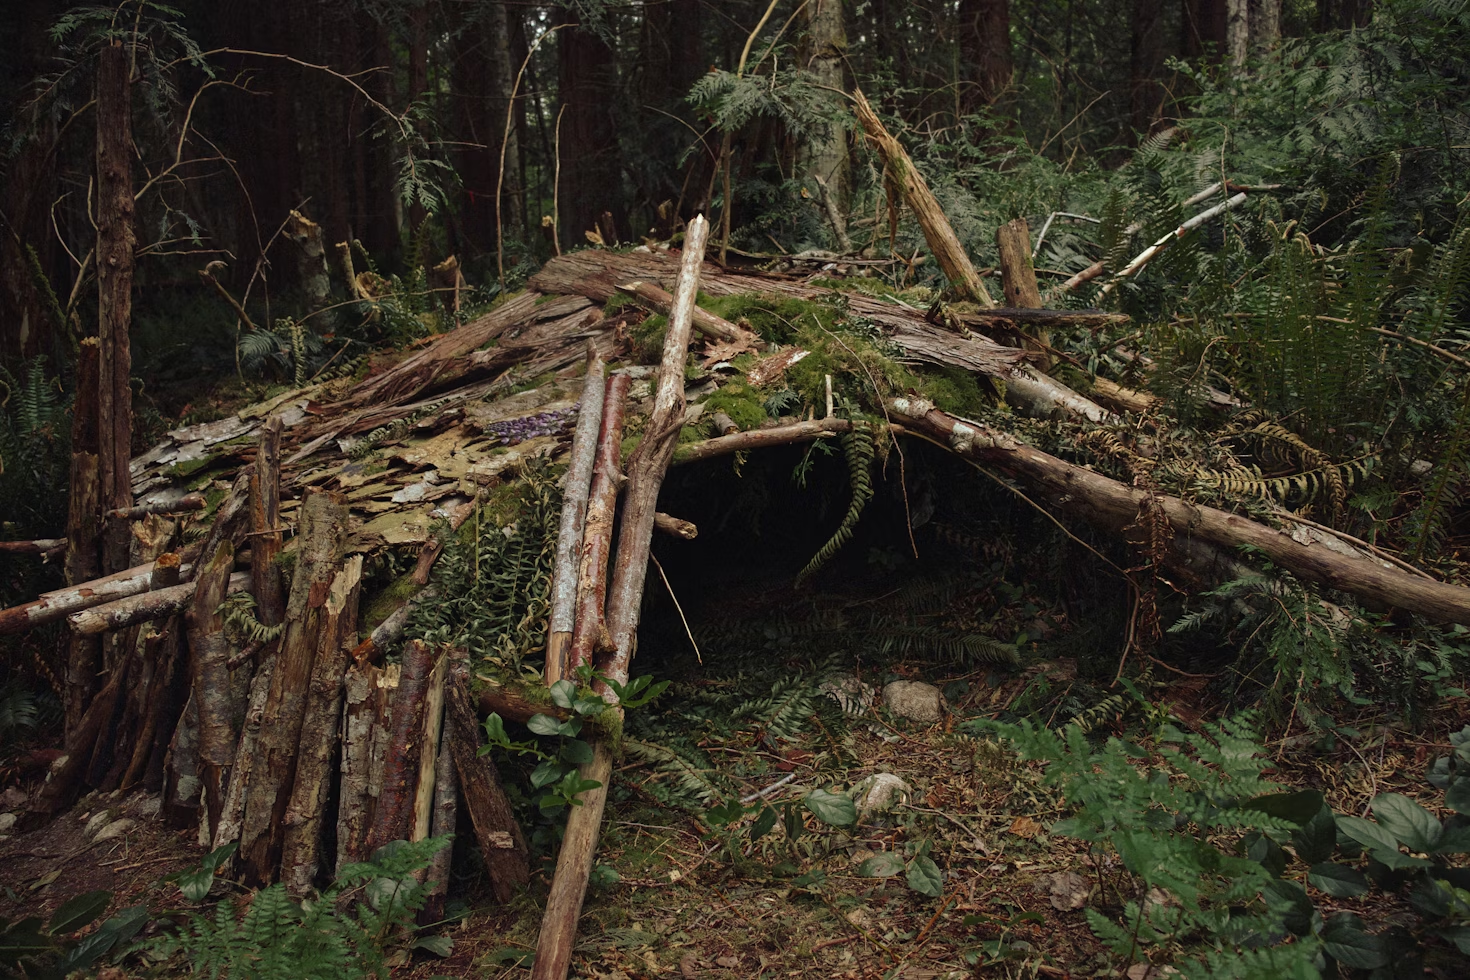
2. Build Shelter Before Nightfall
Your first physical priority is protection from the elements. Wind, rain, and cold will drain body heat faster than hunger or thirst ever could. Hypothermia can set in within hours — even in 50°F weather — especially if you’re wet or exhausted. The golden rule of bushcraft: shelter before fire, water, or food if the environment is cold or damp.
Start by scouting for natural cover. Move methodically, not frantically. Look for:
- Overhanging rocks or shallow rock faces that block rain and wind.
- Dense tree canopies or fallen logs that can serve as partial walls.
- Shallow caves or crevices — but always check for animal signs like scat, bones, or feathers before entering.
If nature provides nothing ready-made, build your own refuge — the classic debris hut is fast, effective, and low-tech:
- Lean a thick branch (your ridgepole) at a 45° angle against a sturdy tree or log.
- Stack smaller sticks and branches on both sides to form ribs.
- Cover the frame with leaves, pine needles, grass, or moss until it’s at least a foot thick.
- Stuff the inside with dry debris or evergreen boughs for insulation and cushioning.
💡 Pro Tip: A well-built debris hut should feel tight — just big enough to crawl in and turn around. The thicker your insulation layer, the warmer it gets. In survival, small and snug beats spacious and cold every time.
3. Find and Purify Water
You can survive up to three days without water, but your body and brain start failing long before that. Dehydration fogs your judgment, drains your energy, and accelerates hypothermia. That’s why water is your next critical mission after shelter. The moment you’re stabilized and protected from the elements, start searching for a drinkable source.
How to Locate Water
- Follow animal tracks or bird patterns: Animals and birds often travel predictable paths to water at dawn and dusk.
- Seek green zones: Lush vegetation, thick grass, or insects like mosquitoes are signs of hidden moisture nearby.
- Check terrain dips: Water flows downhill — follow gullies, ravines, or dry streambeds.
- Dig for seepage: In dry washes, dig 1–2 feet at the outer bends. Give it time — moisture will slowly pool in the hole.
Purifying Without Boiling
If you can’t boil, use nature’s tools to remove sediment and microbes as best as possible.
- Sand & Charcoal Filter: Layer charcoal, fine sand, and gravel in your shirt sleeve, a sock, or a hollowed piece of bark. Pour water slowly; repeat several passes.
- Solar Still: Dig a 2–3 foot hole, place vegetation and a container inside, cover with plastic, and weight the center. Condensed droplets will drip into your cup over several hours.
- Moss Filter: Pack moss into cloth and drip water through it slowly. Moss absorbs impurities and helps remove debris.
💧 Pro Tip: Always treat filtered water as suspect until proven safe. If you have any way to heat or chemically disinfect it later, do it. Clear doesn’t always mean clean.
Even a pocket-sized water filter straw could save you. Grab one here on Amazon.
4. Start a Fire Without Matches
Fire is more than heat — it’s warmth, safety, light, morale, and life itself. It keeps you dry, signals rescuers, wards off animals, and sterilizes water and wounds. Even without gear, you can make flame from raw nature if you understand friction, airflow, and patience.
Primitive Fire-Building Methods
- Bow Drill: Carve a straight spindle (thumb-thick) and a flat fireboard from soft, dry wood like willow or cedar. Use a shoelace, bark cord, or vine to string a bent branch as your bow. Anchor the spindle in the fireboard notch and saw steadily until smoke appears. When the ember glows, transfer it to your tinder nest and blow gently until it flames.
- Fire Plow: Cut a groove down a dry plank of softwood. Rub a hardwood stick quickly back and forth along the groove. Friction dust collects and eventually ignites. It’s labor-intensive but reliable with practice.
- Flint and Steel (or Rock Strike): If you find quartz-like rocks, strike them sharply against another stone or steel object to shower sparks into a dry tinder bundle.
Finding Reliable Tinder
The key is dryness, not quantity. Peel bark from the inside of dead trees, shred dry grass, or scrape fine curls of wood. Tree sap, birch bark, or pine resin burns hot and long.
💡 Pro Tip: Search for fatwood — resin-saturated heartwood from fallen pines. It lights even when wet and burns like a torch.
🔥 Remember: Fire isn’t about strength; it’s about rhythm, oxygen, and persistence. Friction fire teaches patience — your most underrated survival skill.
5. Forage for Edible Food
Food isn’t your first survival priority — shelter, fire, and water always come first — but once those needs are met, you’ll need calories to keep your strength and focus. Even a single high-energy meal can boost morale, body heat, and stamina. The key is choosing low-risk, high-calorie sources that don’t drain more energy to find than they give back.
Safe Wild Edibles
- Dandelion: Every part is edible. Young leaves taste best raw or boiled; roots can be roasted like coffee; flowers are mild and nutrient-rich.
- Pine Needles: Steep in hot water for a vitamin C–rich tea that boosts hydration and immune support. Avoid yew and Norfolk pine — both are toxic.
- Cattail: A survival superfood. The roots, young shoots, and pollen are all edible and high in starch. Roast or boil the rhizomes for quick energy.
- Plantain & Clover: Both are mild-tasting greens you can eat raw. Plantain also works as a natural bandage for cuts or insect bites.
- Insects: Grasshoppers, crickets, and ants are protein powerhouses. Roast them first to kill parasites and improve flavor. Avoid brightly colored or hairy bugs — those are warning signs of toxins.
What to Avoid
Never eat plants with milky sap, an almond-like smell, thorns, shiny leaves, or clusters of unknown berries. When in doubt, skip it. Starving safely beats poisoning yourself.
💡 Pro Tip: Learn your local edible species before you need them. A short field walk today can save your life tomorrow.
Keep a field guide handy. This edible plant guide is a must-have.
6. Navigate Without a Compass
If you must move, do so only when you’re confident in your direction. Wandering aimlessly wastes energy, increases dehydration, and risks leading you farther from potential rescue routes. If you have any reason to believe search teams might be nearby, it’s often smarter to stay put and make yourself visible. But if staying still means danger—floods, fire, or exposure—move with purpose.
Natural Navigation Methods
- Sun: The sun rises in the east and sets in the west, but you can refine that estimate. At midday in the Northern Hemisphere, the sun is roughly due south; in the Southern Hemisphere, it’s north. Use a shadow stick method—place a stick upright, mark the tip of its shadow, wait 15 minutes, then mark again. The first mark points west, the second east.
- Stars: At night, locate the Big Dipper; the two outer bowl stars point straight to Polaris, the North Star. Face it, and you’re looking north. If you’re south of the equator, find the Southern Cross constellation and follow its long axis downward to find south.
- Moss & Vegetation: Moss tends to grow thicker and greener on the north side of trees and rocks in the Northern Hemisphere—but don’t trust this alone. Use it as a clue, not proof.
If You Stay Put
If you decide not to move, signal your location.
- Create large ground symbols (SOS or X) with rocks or logs in open areas visible from above.
- Build three smoky fires in a triangle pattern — the universal distress signal.
- Reflect sunlight with any shiny object: a mirror, a can lid, even your phone screen.
💡 Pro Tip: If you do travel, pick a distant landmark and walk toward it in a straight line, using handrails like ridgelines or streams to maintain your course. Mark your trail with small rock piles or broken branches so you can backtrack if needed.
7. Protect Yourself From Wildlife and Insects
The good news: most wildlife avoids humans. The bad news: when they don’t, it’s usually your fault. Staying aware and managing scent, noise, and food storage keeps encounters safe—for both sides.
Avoiding Problems Before They Start
- Choose Your Sleeping Spot Wisely: Bed down with your head near a tree trunk and your feet downhill. This stabilizes your position and discourages curious animals from approaching face-first.
- Make Noise as You Move: Clap, talk, or tap sticks together every so often in dense brush. Sudden silence startles animals; steady sound warns them away.
- Store Food Smart: If you’ve scavenged food, hang it 10 feet off the ground and 4 feet from the trunk—or bury it at least a foot deep, sealed in bark or cloth. Animals have better noses than you think.
Defense Against Small Threats
The true enemies of the woods aren’t bears—they’re mosquitoes, ticks, and snakes.
- Mosquitoes: Burn green wood or damp leaves to make a smoky deterrent.
- Ticks: Stay out of tall grass, and inspect your skin often, especially behind knees and along your waistband.
- Snakes: Step on logs, not over them, so you don’t surprise one sunning on the other side.
- Natural Bug Repellent: Rub mud, ash, or crushed pine needles on exposed skin. The scent and coating keep insects at bay.
💡 Pro Tip: In real wilderness, scent discipline matters. Don’t sleep with food, toothpaste, or scented items near your bedding. To predators, those smells all mean “something edible.”
8. Mental Strength: The Key to Survival
Your body can go days without food and even a few days without water—but a broken mindset can kill you in hours. The wilderness tests more than endurance; it tests emotional control, discipline, and belief.
Control the Narrative in Your Head
Fear feeds on uncertainty. The moment panic sets in, your problem-solving shuts down. You counter it by setting micro-goals—tiny, winnable tasks that keep your brain focused on progress, not despair.
Examples:
- Gather enough wood for one fire.
- Boil one pot of water.
- Collect enough leaves to make bedding.
Each small victory proves you’re capable—and that proof keeps you moving.
Manage Loneliness and Stress
- Talk out loud to yourself or to nature; it keeps your thoughts organized.
- Keep a rhythm—tasks, rest, reflection, repeat. Predictability lowers anxiety.
- Remember: Someone is looking for you. Rescue operations rarely stop after day one. Every day you survive increases your odds of being found.
Reframe Survival as a Challenge, Not a Curse
Mental toughness doesn’t mean suppressing fear; it means acknowledging it, then acting anyway. When you feel overwhelmed, return to your checklist:
Shelter → Fire → Water → Food → Signals.
Focus on what you can control, and momentum will return.
💡 Pro Tip: A calm survivor attracts help. A panicked one misses opportunities. Keep your head clear—survival is 80% psychology, 20% technique.
If you want to master the rest of the old-school methods that make gear optional, check out 100 Forgotten Survival Skills That Could Save Your Life for more time-tested tricks.
Bonus: 5 Small Tools That Could Save You Next Time
- ✅ Mini water filter straw
- ✅ Ferrocerium firestarter
- ✅ Loud survival whistle
- ✅ Emergency bivvy bag
- ✅ Mini first-aid kit
This skill fits into a larger survival structure — study the full Wilderness Survival Guide (2026) to understand what comes first when you’re truly on your own.
Final Thoughts
In the end, survival isn’t about fancy gear or perfect conditions — it’s about mindset and mastery. When you know how to turn sticks into shelter and sparks into fire, you stop being dependent and start being dangerous—in the best way. Bushcraft skills for preppers aren’t just backup plans; they’re freedom skills. They give you confidence to face any storm, outage, or wilderness challenge head-on. Keep sharpening those instincts and expanding your knowledge through the 100 Forgotten Survival Skills That Could Save Your Life playbook — because the only true survival tool that never fails is you.
Further Reading
- Essential Bushcraft Skills for Preppers
- How to Use a Survival Knife (With Video)
- How to Survive in the Woods with Just a Knife (With Video)
- Top 6 Essentials for DIY Emergency Shelters
- Tracking Animals for Food: Old-School Survival Skills
- 5 Wild Edible Plants You Can Forage Today
- Survival Camping, Anyone?
Free Download
10 Critical Gearless Survival Skills (Printable Checklist)
Want a quick-reference version of this guide? Download the PDF now and keep it in your wallet or glovebox. [Download Now]
As an Amazon Associate, The Savvy Survivalist earns from qualifying purchases.


![[Download Now]](https://www.thesavvysurvivalist.com/wp-content/uploads/2025/05/A_printable_checklist_image_from_The_Savvy_Surviva-1.png)