
How to Find Natural Shade and Build Effective Sun Shelters in the Wild
No tent, no tarp — no problem. When the sun turns hostile and shade is scarce, your best shelter might be the land itself. Natural shade and sun shelters are essential for survival when you’re exposed to extreme heat outdoors. Whether you’re hiking, camping, or caught in an emergency situation, knowing how to find or build shade in the wild can prevent dehydration, sunburn, and heatstroke.
This post contains affiliate links. I may earn a small commission at no extra cost to you. Learn more.
Protecting yourself from the sun isn’t just about comfort—it can mean the difference between thriving and overheating. Understanding how to find natural shade or construct a reliable shelter is a must-have skill for anyone venturing into the wild.
In this guide, you’ll learn:
✅ How to scout for natural shade like a pro
✅ Field-tested methods to build your own sun shelters
✅ What to carry in your survival kit to make it easier
✅ Bonus hacks for staying cool in extreme heat
For complete summer-survival coverage, read How to Stay Cool While Camping in Extreme Heat.
🌳 Top Natural Shade Sources
✅ Thick tree canopies
Look for large hardwood trees like oak, maple, or beech. Their wide, overlapping leaves create deep, reliable shade—way better than sparse pine trees. These types of trees form layered canopies that filter sunlight more effectively, creating a cool microclimate underneath. It’s an ideal place to rest and reduce sun exposure without building anything.
✅ Rock overhangs or cliffs
These offer shade that doesn’t shift with the sun. Plus, they’re cooler to the touch, especially on north-facing sides. Rock formations absorb heat slowly and release it even slower, making them one of the most consistent places to cool off. Watch for potential hazards like loose rocks or signs of animal activity.
✅ Dense shrubbery and underbrush
Brushy areas, especially near water, can block a surprising amount of sun. Kneel or crouch low to maximize the shade. These areas are especially helpful if you’re caught without gear, offering emergency relief from direct sunlight and sometimes hiding cooler air pockets underneath.
✅ Dry creek beds and arroyos
These low-lying areas dip below ground level, giving you partial cover and cooler air—especially if shaded by tall banks or brush. The elevation drop can naturally trap cooler air, and you can often find partial tree cover nearby. Be cautious of flash floods or unstable soil.
✅ North-facing slopes
In the northern hemisphere, north slopes stay shaded longer and get less direct sun exposure in the afternoon. This makes them a great place to stop and rest, especially during peak heat hours. Combined with tree cover, these spots often feel significantly cooler.
💡 Survival Tip: Shade isn’t just for comfort—it’s vital for hydration and preventing heat-related illness. Stop every hour to cool off, drink water, and check for signs of heat stress.
🛠️ How to Build a Sun Shelter from Scratch
If nature’s not offering much shade, build your own. A sun shelter doesn’t have to be fancy—it just needs to block UV and trap cooler air. The type you build depends on what gear you have and how long you plan to stay.
🏕️ 1. Tarp Lean-To Shelter (Basic)
What you need:
- Tarp or emergency blanket
- Paracord or twine
- Trees or trekking poles
Steps:
- Tie two corners of your tarp to trees or poles at shoulder height.
- Stake the back corners into the ground at an angle.
- Face the open side away from the sun.
✅ Pros: Quick setup, good airflow
⚠️ Watch out for: Rain—no floor or side protection
This method is fast and highly effective in open areas. It provides a sloped surface that reflects sunlight and allows hot air to escape, especially when set up with one side slightly higher. You can also pair it with reflective materials to increase sun-blocking power.
Extra Tips:
- Add wind breaks using logs, brush, or gear to shield the sides.
- Drive stakes at a 45° angle away from the tarp tension line for better stability.
- Use rocks if the ground is too hard for stakes. Wrap tarp corners around rocks and tie them off with cord.
- Layer a reflective space blanket above the tarp to enhance UV deflection.
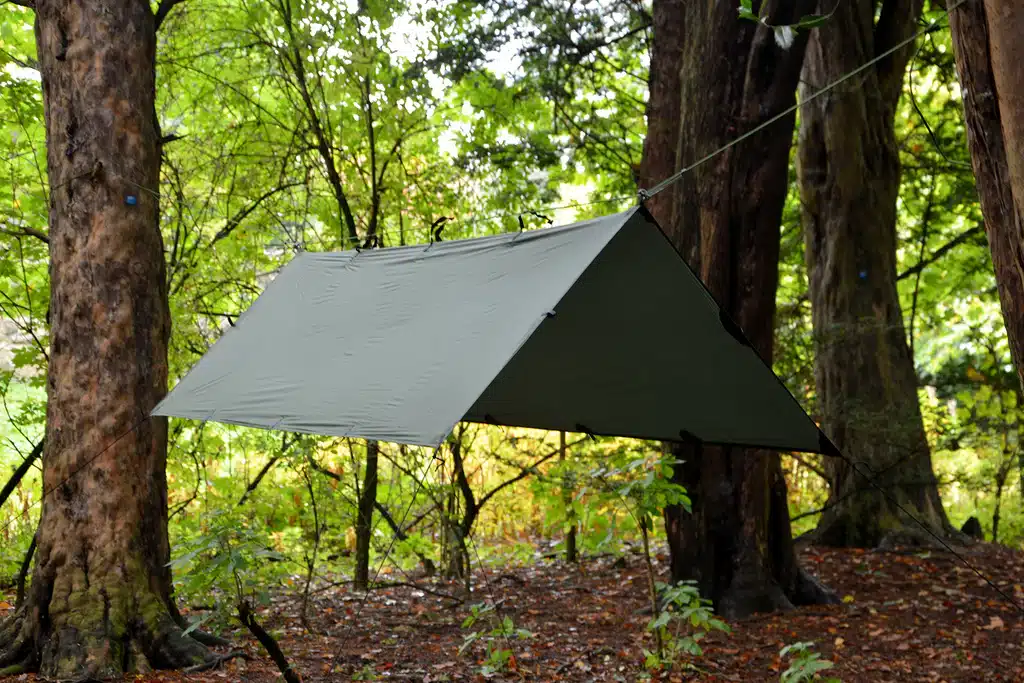
🏞️ 2. A-Frame Shelter (Stronger & Cooler)
What you need:
- Tarp or poncho
- Rope
- Two anchor points (trees, rocks)
Steps:
- Run a rope between two trees about 3–4 feet high.
- Drape the tarp over the rope evenly.
- Stake all four corners out wide for a triangle shape.
✅ Pros: Covers you from both sides
🌀 Bonus: Line the inside with dry leaves for insulation
This type of shelter offers more protection and insulation from sun and wind. It works well in both survival and recreational camping situations. The low angle of the roof helps deflect sunlight while still allowing for ventilation underneath.
Advanced Tips:
- Angle one side lower for rain runoff.
- Add a third trekking pole under the center rope for roof lift.
- Tie a secondary guy line to the middle of the tarp to steepen the pitch.
- Don’t have a tarp? Use a poncho, tent rainfly, or even a plastic painter’s drop cloth.
🌾 3. Bushcraft Debris Shelter (Primitive)
If you’ve got no tarp or gear, use what’s around you.
Steps:
- Find a downed tree or thick branch angled like a ridge.
- Lean branches or logs on each side to form walls.
- Cover the outside with leaves, bark, pine needles, or brush.
- Leave one side open for ventilation.
🌲 Time-intensive, but great insulation and sun block
🔥 Best for long-term base camps or emergencies
This shelter takes more effort, but the payoff is strong. With enough debris layered on top, it can reduce interior temperatures by 10°F or more and provide nighttime insulation as well. Just ensure the structure is stable and doesn’t risk collapse.
Advanced Techniques:
- Use 12–18 inches of layered debris for optimal sun and heat protection.
- Build a strong triangular frame with green branches to support the walls.
- Dig a shallow interior floor and add plant material for bedding insulation.
- In a pinch, prop a reflective blanket above your resting area under a single log or brush lean-to.
🛒 Recommended Gear:
✅ Lightweight tarp or reflective emergency blanket
Grab a compact tarp or Mylar blanket on Amazon – great for fast shelter setup. Tarps are ideal because they’re lightweight and durable, while reflective blankets bounce UV rays and help regulate temperature.
Compact, multi-use, and gives instant overhead protection. Tarps are ideal because they’re lightweight and durable, while reflective blankets bounce UV rays and help regulate temperature.
✅ Paracord (at least 25 ft)
👉 Grab this 550 paracord bundle
This paracord bundle works for shelters, fishing line, and emergency fixes. Choose 550 paracord or higher for strength and durability. It also doubles as fishing line, shoelaces, or emergency repairs.
Crucial for tying off tarps, building lean-tos, or securing corners. Choose 550 paracord or higher for strength and durability. It also doubles as fishing line, shoelaces, or emergency repairs.
✅ Stakes or trekking poles
👉 See this set of ultralight aluminum stakes
Used to prop up your shelter or secure it to the ground. If you don’t have stakes, sharpened sticks or rocks can substitute in a pinch.
✅ Knife or multitool
👉 Trusted Gerber Suspension Multi-Tool
Try this compact survival multitool with knife, saw, and fire starter. Always carry a reliable blade—it’s the single most versatile tool for survival scenarios.
For cutting cord, sharpening sticks, or assembling debris shelters. Always carry a reliable blade—it’s the single most versatile tool for survival scenarios.
✅ Wide-brim hat & UV sleeves
👉 Try this sun-protection bundle
Personal sun protection when you’re exposed or hiking without cover. Combined with sunscreen, these items protect skin and regulate body temperature.
💡 Pro Tip: A reflective tarp can double as nighttime insulation—blocking sun during the day and bouncing warmth back at night.
🔥 Bonus: Shade Hacks to Stay Cool Longer
- 🧴 Wet a bandana and wear it around your neck or head. Instant evaporative cooling. It keeps blood near the surface cooler, reducing overall core temp.
- 💦 Dig a shallow pit under your shelter. Cooler earth underneath will trap cold air. Just a few inches deep can make a major difference.
- 🌬️ Hang reflective blankets facing outward to reflect heat away. If you’re using a tarp, add reflective material on the sun-facing side.
- 🌅 Set up before 10AM and reposition as needed—shade moves! Sun angles shift quickly, so reassess every 2 hours.
🚨 When to Act Fast
If you or someone in your group shows signs of:
- Dizziness
- Nausea
- Confusion
- Rapid pulse
⚠️ Get them into shade immediately, elevate feet, and hydrate slowly. This could be heat exhaustion—and it’s a short step away from heat stroke. Don’t wait. If symptoms don’t improve quickly, seek medical help.
Once your shelter’s up, stay hydrated with a hot-weather hydration pack and recover under shade using a DIY cooling neckwrap to keep your body temperature steady.
📌 Final Thoughts: Prepare Before You Burn
Nature is generous—but not always convenient. The ability to find natural shade and build your own shelter can be the difference between resilience and risk, especially during hot summer days when dehydration and heatstroke strike fast. Shelter-building is not just a wilderness task—it’s a life-saving habit that belongs in your mental checklist every time you pack a bag or plan a route.
Think of your shade strategy the same way you think about food, water, and fire—it’s not optional. Practice building different types of shelters before you need them. Know what gear you’re comfortable using. Experiment with local materials. And most importantly, plan ahead: check weather forecasts, choose shaded campsites, and hydrate early and often.
Even in the most unforgiving terrain, the prepared survivalist doesn’t just survive—they thrive. So stay smart, stay shaded, and take the sun seriously.
☀️ Don’t let the sun drain your energy. Shade is survival. Learn it. Build it. Respect it.
🔗 Further Reading:
Affiliate Disclosure: Some of the links in this article are affiliate links, which means if you click and make a purchase, we may earn a small commission at no extra cost to you. We only recommend products we trust and use ourselves.


