How to Evacuate a High-Rise Apartment During an Emergency (Urban Survival Guide)
Evacuating a high-rise during a disaster isn’t as simple as heading for the stairs — it’s a race against smoke, chaos, and gravity. When the power goes out, elevators stop and stairwells fill fast. Having your apartment prepping system in place and your city bug-out plan mapped in advance can mean the difference between a clean exit and getting trapped above the chaos.
This post contains affiliate links. I may earn a small commission at no extra cost to you. Learn more.
If you live above the second floor, high-rise evacuation is a non-negotiable skill inside any complete urban survival guide.
Evacuate or Shelter in Place? Make the Call Fast
Your decision in the first 60 seconds determines your odds.
- Fire (most common): Take the stairs. Never elevators. Feel your door/handle with the back of your hand. If cool, crack low and stay behind the door as a shield. Close doors behind you to slow fire.
- Chemical smoke/outside hazard: Often safer to shelter in place. Pick an interior room, shut HVAC, seal gaps with plastic & tape, and monitor official alerts.
- Earthquake: Don’t run during shaking. Drop, Cover, Hold On. Evacuate after it stops if conditions warrant.
- Active threat: Avoid/Evacuate if safe. If not, barricade and hide. Confront only as a last resort.
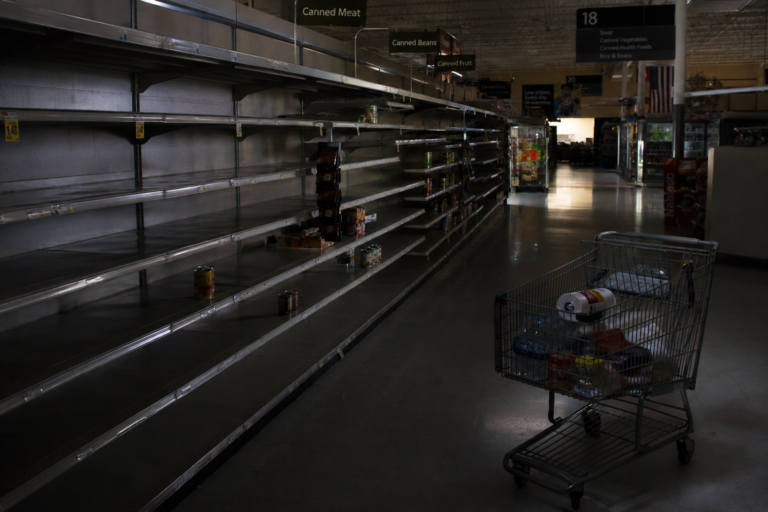
Why High-Rise Blackouts Become Dangerous Fast
High-rise buildings depend heavily on electricity to keep everyday life functioning normally. Once power fails, elevators stop, stairwells darken, ventilation systems slow down, water pressure can weaken on upper floors, and panic starts spreading quickly throughout crowded buildings.
Even short blackouts become more dangerous in large apartment towers because hundreds of residents may suddenly attempt to evacuate at the same time. Stairwells become congested, emergency lighting may fail, and smoke or heat can spread rapidly during fires or infrastructure failures.
Many residents also underestimate how quickly panic spreads once emergency lighting fails and hundreds of people begin flooding stairwells at the same time.
The higher you live, the more important speed, preparation, and mobility become during any emergency evacuation.
For a deeper breakdown of cascading infrastructure failures, see our guide on what happens when the grid goes down.
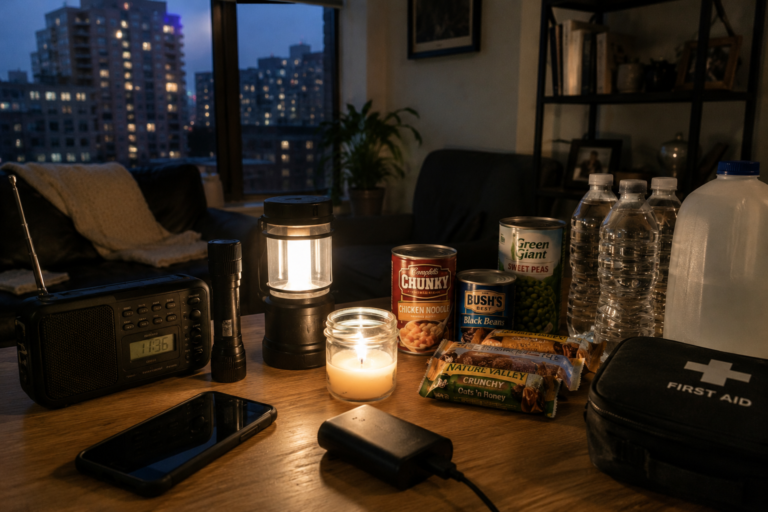
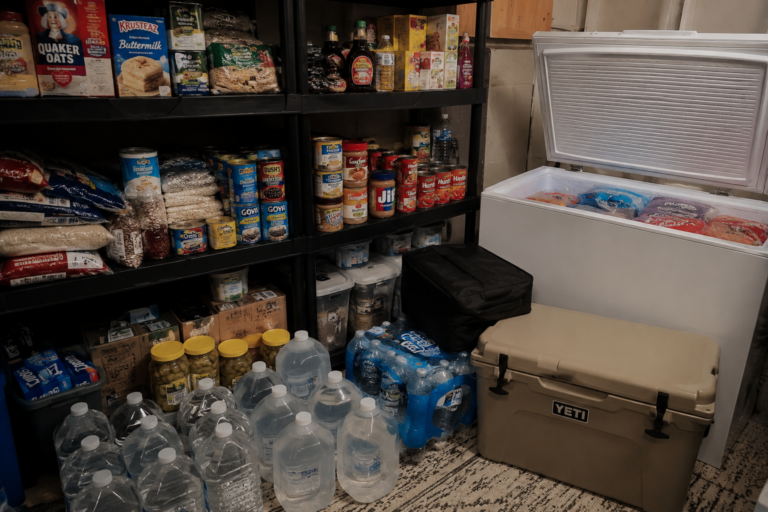
Build a High-Rise Evacuation Kit Before You Need It
Keep it right by the exit. One per adult; scaled version for kids.
Egress & Protection
- Smoke/escape hood (15–60 min) – Buy Now on Amazon ✅
- Sturdy shoes, work gloves, eye protection
Light & Comms
- Headlamp (AA/AAA) – Buy Now on Amazon ✅
- Pocket flashlight, whistle/mini air horn, power bank + short cable
Access & Docs
- Spare keys/fobs on break-away lanyard
- Laminated stair map (two routes + re-entry floors)
- Fire-resistant document pouch – Buy Now on Amazon ✅
Medical & Essentials
- Mini IFAK, meds for 72 hours
- 1L water pouch, quick calories
- Pet leash/carrier by the door
Smart Add-Ons
- Compact Emergency Radio – Buy Now on Amazon ✅ (stays useful for shelter-in-place)
- Portable Fire Escape Ladder – Buy Now on Amazon ✅ (if near a balcony/window)
Know Your Building Before You Need It
- Find two stairwells; open them from your floor. Note if one is pressurized/smoke-proofed.
- Mark re-entry floors (stair doors may lock). Put them on your stair card.
- Identify Areas of Refuge and evac chairs for mobility-impaired neighbors.
- Learn alarm tones & PA messages; know which doors must stay shut (fire doors).
Step-by-Step: Fire Evacuation That Works
- At the door: Headlamp on, shoes on, grab kit. Feel door/handle with the back of your hand. If hot, don’t open—seal and call 911 with exact location.
- Crack low, stay behind the door. If tenable, step into the hall. Close your unit door fully behind you to slow fire spread.
- Take the stairs—never the elevator. Keep right to let responders pass. Don’t stop on landings.
- Smoke = go low. Air is clearer near the floor. Follow the wall to the stairwell. If that stair is smoke-charged, use the alternate.
- If trapped: Go to a room with a window/balcony, close doors between you and smoke, seal gaps with wet towels, call 911, signal at the window.
Note: Some newer buildings have evacuation-rated elevators used under official direction. Unless told otherwise, your plan = stairs.
Earthquakes in High-Rises: Do This, Not That
- During shaking: Drop, Cover, Hold On under sturdy furniture or against an interior wall; protect head/neck. Do not run for the stairs.
- After shaking: Expect aftershocks. Check for fire/smoke/structural damage. If safe, take stairs to your rally point.
Active Threats in Towers
- Avoid/Evacuate: If you have a clear path, create distance without bottlenecking at lobbies or choke points.
- Barricade: Lock doors, block with furniture, lights off, phones silent, out of sight.
- Confront only as an absolute last resort if your life is in immediate danger.
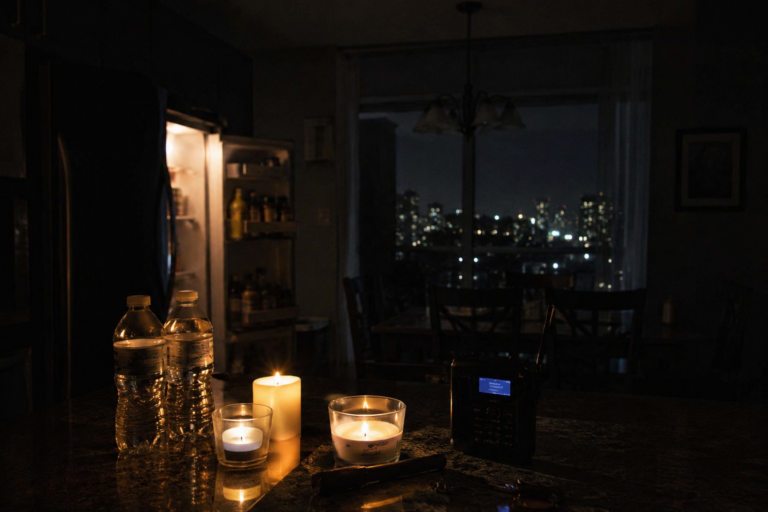
If Authorities Say “Shelter in Place”
- Select an interior room with minimal windows.
- Turn off fans/HVAC; seal gaps with plastic & tape.
- Monitor alerts; prepare to evacuate when directed.
Families, Pets & Mobility
- Kids: Assign a lead adult & sweep adult. Put an ID/contact card in each kid’s pocket. Teach stairwell letter/color & rally point.
- Mobility: Pair with a buddy team. Identify evac chairs & trained operators ahead of time.
- Pets: Keep leash & small carrier by the door. Contain fast in smoke.
Your 10-Minute Monthly Drill
- Walk both stair routes; time your descent.
- Practice counting doors to the stair in the dark.
- Test headlamp/whistle; check batteries & meds.
- Review meeting points & emergency contacts.
- Do one “eyes-closed” walk with a partner spotting to simulate low visibility.
Common Mistakes in High-Rise Evacuations
- Relying on elevators – fatal in fire or power loss.
- Grabbing too much stuff – seconds matter; take your kit, nothing else.
- No shoes – glass & debris shred bare feet.
- Ignoring smoke hoods – smoke kills faster than flames.
- Not knowing stair re-entry floors – can trap you between locked doors.
- Failing to train family/pets – panic wastes precious time.
After You’re Out
- Move to your rally point across the street & downwind.
- Headcount your group.
- Do not re-enter until cleared by fire department.
- Document damage for insurance; report failed life-safety gear.
The higher you live, the less time you have. With a practiced blackout routine, a clear evacuation path, and the right gray man gear, you’ll move before panic even reaches your floor.
Print & Tape This “Door Card” Inside Your Apartment
- Headlamp on, shoes on, grab kit
- Feel door/handle (back of hand)
- Crack door low, stay behind as a shield
- Choose Stair A or B • Keep right • Don’t stop
- If smoke: stay low, follow the wall
- If trapped: seal, call 911, signal from window/balcony
Final Word
Surviving a high-rise emergency isn’t about luck—it’s about preparation, clear thinking, and rapid action. When seconds matter, knowing your exits, having a practiced plan, and keeping essential gear within arm’s reach can make all the difference. If you live or work in a multi-story building, your high-rise evacuation kit should always be ready at the door—complete with a smoke escape hood, headlamp, and other life-saving essentials. These tools aren’t just “nice to have”—they can buy you precious minutes to navigate smoke-filled stairwells and reach safety. Make it a habit to run evacuation drills, update your gear, and keep your family or roommates in the loop. The more you prepare now, the calmer and faster you’ll react when the alarm sounds. In a real high-rise emergency, you won’t be guessing—you’ll be moving with confidence toward survival.